Saturday 22 June 2013

How To Create Metro UI Navigation Menu in Blogger Blog
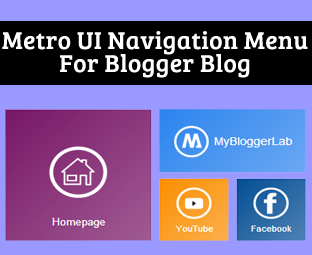
Are you bored with your website’s navigation menu? Does anyone want to revamp his unappealing navigation menu into Windows 8 Style Metro Menu? Navigation menu is one of the core elements of a website because without a user-friendly Menu visitors can’t search the content in depth. In this situation, an ugly Navigation Menu could act a piece of garbage. Therefore, it is essential to have an elegantly style Navigation Menu that attracts a person like a bee to a honey. To provide more power to Blogger users, we have created a new windows 8 look like Metro UI Navigation menu for blogger enabled websites. It has tons of features which we will discuss in today’s article. 

What is METRO UI Menu?

If anyone has experience the interface of Microsoft Windows 8, or the new range of Windows Smart phones, then this METRO UI menu is not a new thing for them. This Menu is inspired from the navigation interface of Windows 8. If anyone is still chaotic about it, then he can check out the following screenshot. 

Where The Metro UI Menu Would Appear?

It depends on a person that where he wants to utilize this Menu because it is so flexible that it can take shape of any theme or template. However, it would be ideal if anyone places this menu at the top of his website by doing that, visitors can easily access it without facing any hesitation whatsoever. We have attached an interactive Metro menu below so don’t hesitate to try it. 

How to Create Windows 8 like Metro Menu in Blogger?

The steps mentioned below are ideal for those bloggers who have less knowledge about HTML coding. Following instructions are extremely straightforward so anyone can easily apply them. Follow following instructions correctly.

Step#1: Adding CSS StyleSheet:
  • Go to Blogger.com >> Template.
  • Select Edit HTML >> Proceed.
  • Now within the template search for ]]></b:skin> tag and just above it paste the following CSS Coding. Once, everything is done Save the Template by pressing “Save Template” Button and proceeds to the next step. 
/*===MBL METRO UI Menu==*/

body {
font-family:sans-serif;
}
a {
text-decoration:none;
}
.mblmetromenu {
width:960px;
margin:auto;
}
@media screen and (max-width:960px) {
.mblmetromenu {
width:100%;
}
}

/* MblMetroMenu */
.MblMetroMenu {
position:relative;
}
.om-nav {
position:absolute;
width:100%;
z-index:999;
display:none;
}
.om-ctrlbar {
width:100%;
height:48px;
}
.om-ctrlitems {
margin:auto;
padding:0px;
height:48px;
display:inline-block;
text-align:center;
}
.om-ctrlitem {
height:48px;
width:48px;
display:none;
cursor:pointer;
float:left;
opacity:0.5;
-ms-filter: "progid: DXImageTransform.Microsoft.Alpha(Opacity=50)" !important;
filter: alpha(opacity=50) !important; /* For IE8 and earlier */ }
.om-ctrlitem:hover {
opacity:0.8;
-ms-filter: "progid: DXImageTransform.Microsoft.Alpha(Opacity=80)" !important;
filter: alpha(opacity=80) !important; /* For IE8 and earlier */ }
.om-activectrlitem {
opacity:1 !important;
-ms-filter: "progid: DXImageTransform.Microsoft.Alpha(Opacity=100)" !important;
filter: alpha(opacity=100) !important; /* For IE8 and earlier */ }
.om-controlitems {
width:960px;
margin:auto;
}
.om-controlitem {
height:48px;
cursor:pointer;
}
.om-closenav {
float:left;
}
.om-movenext {
float:right;
}
.om-itemholder {
margin:auto;
padding:20px 0px;
}
@media screen and (max-width:960px) {
.om-closenav {
position:absolute;
z-index:9999;
left:0;
top:0;
}
.om-movenext {
position:absolute;
z-index:9999;
right:0;
top:0;
}
.om-controlitems {
width:100%;
}
.om-itemholder {
width:100%;
}
}
.om-centerblock {
display:inline-block;
}
.om-item {
display:none;
}
.om-showitem {
margin:5px;
float:left;
display:none;
}
/* END MblMetroMenu */

/* TILE BUTTONS */
/* Standar Buttons */
.tile-bt {
text-align:center;
cursor:pointer;
width:90px;
height:90px;
}
.tile-bt a {
display:block;
padding-top:12px;
text-decoration: !important;
}
.tile-bt img {
margin:0 auto 0 auto;
padding-bottom:5px;
height:48px;
width:48px;
position:relative;
display:block;
}
.tile-bt span {
font-size:12px;
padding-bottom:10px;
display:block;
}
.tile-bt:active {
opacity:0.5;
}
/* End Standard Buttons */


/* Large Buttons */
.tile-bt-large {
width:190px;
height:90px;
line-height:90px;
text-align:center;
cursor:pointer;
}
.tile-bt-large a {
display:block;
text-decoration: !important;
}
.tile-bt-large img {
vertical-align: middle;
margin:auto;
padding:0px;
position:relative;
width:48px;
height:48px;
}
.tile-bt-large span {
vertical-align: middle;
display:inline;
}
.tile-bt-large:active {
opacity:0.5;
}
/* End Large Buttons */
/* Extralarge Buttons */
.tile-bt-extralarge {
text-align:center;
cursor:pointer;
width:190px;
height:190px;
}
.tile-bt-extralarge a {
display:block;
padding-top:52px;
text-decoration: !important;
}
.tile-bt-extralarge img {
margin:0 auto 0 auto;
padding-bottom:22px;
height:80px;
width:80px;
position:relative;
display:block;
}
.tile-bt-extralarge span {
font-size:14px;
padding-bottom:20px;
display:block;
}
.tile-bt-extralarge:active {
opacity:0.5;
}
/* End Extralarge Buttons */

/* END TILE BUTTONS */

/* SHADOW LIST */
.shadow-white, .shadow-black, .shadow-blue, .shadow-green, .shadow-red {
/*display:inline-block;*/
}
.shadow-white:hover {
box-shadow:0px 0px 6px 3px #fff;
-webkit-box-shadow:0px 0px 6px 3px #fff;
-moz-box-shadow:0px 0px 6px 3px #fff;
-o-box-shadow:0px 0px 6px 3px #fff;
-ms-box-shadow:0px 0px 6px 3px #fff;
}
.shadow-blue:hover {
box-shadow:0px 0px 6px 3px #38D1F7;
-webkit-box-shadow:0px 0px 6px 3px #38D1F7;
-moz-box-shadow:0px 0px 6px 3px #38D1F7;
-o-box-shadow:0px 0px 6px 3px #38D1F7;
-ms-box-shadow:0px 0px 6px 3px #38D1F7;
}
.shadow-green:hover {
box-shadow:0px 0px 6px 3px #AACA37;
-webkit-box-shadow:0px 0px 6px 3px #AACA37;
-moz-box-shadow:0px 0px 6px 3px #AACA37;
-o-box-shadow:0px 0px 6px 3px #AACA37;
-ms-box-shadow:0px 0px 6px 3px #AACA37;
}
.shadow-red:hover {
box-shadow:0px 0px 6px 3px #E81750;
-webkit-box-shadow:0px 0px 6px 3px #E81750;
-moz-box-shadow:0px 0px 6px 3px #E81750;
-o-box-shadow:0px 0px 6px 3px #E81750;
-ms-box-shadow:0px 0px 6px 3px #E81750;
}
.shadow-black:hover {
box-shadow:0px 0px 6px 3px #444;
-webkit-box-shadow:0px 0px 6px 3px #444;
-moz-box-shadow:0px 0px 6px 3px #444;
-o-box-shadow:0px 0px 6px 3px #444;
-ms-box-shadow:0px 0px 6px 3px #444;
}
/* END SHADOW LIST */
/* BACKGROUND LIST */
/* Solid Colors */
.solid-blue { background:#00BBE2; }
.solid-blue-2 { background:#2C84EE; }
.solid-darkblue { background:#044E94; }
.solid-violetred { background:#781766; }
.solid-red { background:#E51400;}
.solid-red-2 { background:#E81750; }
.solid-pink { background:#FF539B; }
.solid-purple { background:#D02090; }
.solid-orange { background:#FB8F02; }
.solid-orange-2 { background:#FF6600; }
.solid-orange-3 { background:#DD5F37; }
.solid-coral { background:#CD5B45; }
.solid-green { background:#67B239; }
.solid-green-2 {background:#96BF01; }
.solid-darkgreen { background:#016C38; }
.solid-olive { background:#999900}
.solid-grass { background:#CDCD00; }
.solid-darkred { background:#5F0000; }
.solid-gold { background:#FEE9AE; }
.solid-yellow { background:#F7D100; }
.solid-black { background:#000; }
.solid-smoke { background:#F5F5F5; }
/* End Solid Colors */

/* MISC */
.clearspace { clear: both; }
.floatleft { float:left; }
.floatright { float:right; }
.none { display: none !important; width:0px !important; }
.light-text {
color:#fff;
}
.dark-text {
color:#1e1e1e;
}
.gradient {
background: -moz-linear-gradient(-45deg,  rgba(255,255,255,0) 0%, rgba(255,255,255,0.3) 100%); /* FF3.6+ */
background: -webkit-gradient(linear, left top, right bottom, color-stop(0%,rgba(255,255,255,0)), color-stop(100%,rgba(255,255,255,0.3))); /* Chrome,Safari4+ */
background: -webkit-linear-gradient(-45deg,  rgba(255,255,255,0) 00%,rgba(255,255,255,0.3) 100%); /* Chrome10+,Safari5.1+ */
background: -o-linear-gradient(-45deg,  rgba(255,255,255,0) 0%,rgba(255,255,255,0.3) 100%); /* Opera 11.10+ */
background: -ms-linear-gradient(-45deg,  rgba(255,255,255,0) 0%,rgba(255,255,255,0.3) 100%); /* IE10+ */
background: linear-gradient(-45deg,  rgba(255,255,255,0) 0%,rgba(255,255,255,0.3) 100%); /* W3C */
}
.margin-5 { margin:5px; }

Step#2: Adding METRO Menu in Blogger:
  • Now it entirely depends on a person where he wants to place this menu. The ideal place of adding it would be just under the header. Therefore, paste the following coding anywhere you want to see this Menu on your site.
<!-- mblmetromenu -->
<div class="mblmetromenu">

<div data-navid="om-nav" class="tile-bt-extralarge solid-violetred shadow-black margin-5 floatleft MblMetroMenu">
<a href="#" class="gradient">
<img src="https://blogger.googleusercontent.com/img/b/R29vZ2xl/AVvXsEjCnoxaNeRpS_kbDuoOn0fxBRnmKRX9CtcGKGdf4T_TXRB3JdE_pRmj-9j4S0sSO9DOnHEL8lnrKzPX5_nUZ7GwANOKp_mfKzoVNU9w78n38xAADAalGPivnBuxdAHr4FRBlMXcQBjHkZ8/s1600/home.png" alt="" />
<span class="light-text">Homepage</span>
</a>
</div>
   
<div data-navid="om-nav" class="tile-bt-large solid-coral shadow-red margin-5 floatleft MblMetroMenu">
<a href="#" class="gradient">
<img src="https://blogger.googleusercontent.com/img/b/R29vZ2xl/AVvXsEiqEtdZmAyxEYB2pZsQ0MtEwtB-FC3bsILYyLCpycgPN4lRnSeE7XTN1qOx6RuCRBk4QnuX1lK5TgpD9tcPTFiWgf85F6XWiYzjwDq_0Zex6bi0_9YKkqcGnNT0zJ4CNiZQtGbjx4wKFAw/s1600/messanger.png" alt="" />
<span class="light-text">About US</span>
</a>
</div>
   
<div data-navid="om-nav2" class="tile-bt solid-purple shadow-blue margin-5 floatleft MblMetroMenu">
<a href="#" class="gradient">
<img src="https://blogger.googleusercontent.com/img/b/R29vZ2xl/AVvXsEhppTKCOMAbH50Zy6DW6tFqSXi2gyPh9Ier29U2JKlW2N7wkoNCQLFKI_tS-DwdOIaXnB-neRleDxrNtOeo_7dOzANxu457XYprmFrOWubcCNTpT8vIoY101OA_7fHBhh0tmA_7z0Wff4Y/s1600/rss.png" alt="" />
<span class="light-text">Rss Feeds</span>
</a>
</div>
   
 <div data-navid="om-nav" class="tile-bt-large solid-red shadow-red margin-5 floatleft MblMetroMenu">
<a href="#" class="gradient">
<img src="https://blogger.googleusercontent.com/img/b/R29vZ2xl/AVvXsEhbKpk3KYmCReBtsrmMk2rz0yVnmHQbvmBiQI-n7mk-RXYqUPtNn5CQ1o8z4B2gYCHZUe4sIW9MqQL9zEHRXxFHyOBl008WaAcAseGJcAjmqo56sP-oFHuTwxJS654SEuxtRbxUsw_6JGM/s1600/search.png" alt="" />
<span class="light-text">Search</span>
</a>
</div>
     
 <div data-navid="om-nav2" class="tile-bt solid-darkred shadow-red margin-5 floatleft MblMetroMenu">
<a href="#" class="gradient">
<img src="https://blogger.googleusercontent.com/img/b/R29vZ2xl/AVvXsEgxFfktrAweEjpf6srBgmWZgE8TD1xBo1U_Y_oCB81Oi3b9zE-5iCCtE2SjH51CgEQCmGuOq4O0Kb-ICTBqTLQo2VSJfpnzRC0vnRBRyrt7CNamwe3paZkCEduftitHHZuMPn2FbGOkh0A/s1600/mail.png" alt="" />
<span class="light-text">Contact US</span>
</a>
</div>
     
<div data-navid="om-nav2" class="tile-bt solid-black shadow-black margin-5 floatleft MblMetroMenu">
<a href="#" class="gradient">
<img src="https://blogger.googleusercontent.com/img/b/R29vZ2xl/AVvXsEinfGGu38rNlzcE5LCkjXSRFbe9p_8ko8U4CH7E3P9UQFCD3mUlSqlzrfKA7VGWWauQVJwY1gg7hh6TCQFr539l7EIWqK47f1hh3qLlEz7yulQSNd0B575y5kC8MyF6NatInp5-q47ZQ1E/s1600/help.pn" alt="" />
 <span class="light-text">Get HELP</span>
</a>
 </div>
     
<div data-navid="om-nav2" class="tile-bt solid-orange shadow-black margin-5 floatleft MblMetroMenu">
<a href="#" class="gradient">
<img src="https://blogger.googleusercontent.com/img/b/R29vZ2xl/AVvXsEhxFrJBQ8oYWIY4zQeehapWZRpEVyU2lsvesS7RjqiUXG9X5AVBPoQFUTw4Yb_vXKG_vOMyu9TjJYlxujfs0LDg376Nytn_r1jd-EQahrlxZzFVAx2aTJKPBbIHd3oSmEDLIhU1pRdEb1E/s1600/youtbe.png" alt="" />
<span class="light-text">YouTube</span>
</a>
</div>
     
<div data-navid="om-nav2" class="tile-bt solid-darkblue shadow-blue margin-5 floatleft MblMetroMenu">
<a href="#" class="gradient">
<img src="https://blogger.googleusercontent.com/img/b/R29vZ2xl/AVvXsEgNv97acAwAPpYYV7tzE99sez9rhB2vNSudkWUZy7O3vyC_XXJiC6OwWFT924QWoW5th1Zxjhqon3RO-hXyvy92M1lAvmO9freLCLXcLx9G6oyyMYwAMQl7oAiH5SgvamfGkavWpvmXjqo/s1600/face.png" alt="" />
<span class="light-text">Facebook</span>
</a>
</div>
     
<div data-navid="om-nav" class="tile-bt-large solid-blue shadow-blue margin-5 floatleft MblMetroMenu">
<a href="#" class="gradient">
<img src="https://blogger.googleusercontent.com/img/b/R29vZ2xl/AVvXsEgm0OTw0lsp4Bb3ppPwDF-XLe7cFifX-HGqOgsSH7AXZB7h5o_oxd0qPkVfJnColrbIZo3Kul6Aifg_lMfgyH_F9qNlJ1wgxGGaJ7Weh8uf8C0e9pbcstVKw89ZgYmcyVVQQVK9RSA9soc/s1600/photo.png" alt="" />
<span class="light-text">Photos</span>
</a>
</div>
     
<div data-navid="om-nav2" class="tile-bt solid-olive shadow-green margin-5 floatleft MblMetroMenu">
<a href="#" class="gradient">
<img src="https://blogger.googleusercontent.com/img/b/R29vZ2xl/AVvXsEifgW_qCJJsDMp9nwLkefd1mwTImAves5mtvNzubXwQU5EWVMIKgj-Ye4011lGhnGXiYv7XDRWMM3qMpPdBN3lmv7nb_GhAp2rLrcNXPLiO2iqpm4wHN3LWzhMZ-_SbWaAGQqFCGCav6Ak/s1600/music.png" alt="" />
<span class="light-text">Music</span>
</a>
 </div>
     
<div data-navid="om-nav" class="tile-bt-large solid-blue-2 shadow-blue margin-5 floatleft MblMetroMenu">
<a href="http://www.mybloggerlab.com" class="gradient">
<img src="https://blogger.googleusercontent.com/img/b/R29vZ2xl/AVvXsEiyFzR-auFomzSSe4Ox94w0hB77hpNx5RHLiml3apr33JgiYttppLL7Bq74FPHGxqSRHnad8ulVmYNylBL5kOy5Vid0MeKyp1YLzCCoZ4QIwEkUYQdkafjQncuiYg1BttnucjiBXPGkLMM/s1600/MBL.png" alt="" />
<span class="light-text">MyBloggerLab</span>
</a>
</div>
        <!-- End MblMetroMenu -->
</div>
<!-- END mblmetromenu -->
All Done: Indeed straightforward? Well, that’s all. The responsive Windows 8 look like navigation menu has been integrated in your website. Remember: This Menu can be used on any Platform that supports HTML or CSS i.e. WordPress, Jhoomla and etc.

From the Editor's Desk:

Hope everyone has enjoyed today's feast. There are some new surprises planed soon. Let me give you a few clues, we are soon to start a new site. Hope you guys would appreciate that project too. What are your thoughts about this Windows 8 Metro Menu? Take a lot care till them, Peace, Blessings and Happy blogging. 

How To Create Breadcrumbs Navigation in Blogger Blogs

Breadcrumbs Navigation is always deliberated as a core element of a blog. Some people may take it as a useless or unnecessary thing while other, thinks that it is an ideal way of allowing your users to navigate the older pages with ease. It is a fact, that Breadcrumbs increases the usability of a blog. Breadcrumbs provide an alternative method to the visitors so they can easily navigate similar articles without going through lots of different pages. 

Today in this article, we will integrate Breadcrumb navigation widget in Blogger Blog and would also learn about it advantages that Why a Person should use Breadcrumb navigation menu in Blogger enabled websites.


What are Breadcrumbs?

Breadcrumb is a name of navigation links, which are used to provide user-friendly experience to the visitors. Fundamentally, it allows users to keep track of their location within a website. They usually appear horizontally at the top of a website or a webpage. They show links of the previous page that the user navigated through in order to reach into the current page. The breadcrumbs provide a path to users so they can easily navigate to the old pages. A greater-than sign (<) is often used which works as a heritage separator. Typically, breadcrumbs usually look like this.

Advantages of Using Breadcrumbs:

To convince someone to start using Breadcrumbs it’s essential to show him the advantages of it. Consider the following meaningful advantages of using Breadcrumbs. 

  • Reduces Bounce Rate:Typically, by adding breadcrumbs it will provide a comprehensive navigation menu to your visitors, it will help users navigate back-to-back pages. Eventually, it will help in reducing the bounce rate of a website, and would engage users for a longer period of time.
  • Builds Strong Interest: Whenever, a visitor lands on a website he has no information about its interface. In the ODDs, he can always use Breadcrumbs navigation to navigate through different pages according to their interests. It would surely build strong interest among the user.
  • Easy to Back Track: The primary navigations are not designed to back track the parent navigation. However, Breadcrumbs are flexible enough to track back the parent directories that help users to navigate according to their interests.
  • Improves Usability: Breadcrumbs provide additional linking that help users to navigate. For example, a user land on your site or an internal page of your site. In this situation, breadcrumbs would help him to understand where he had landed within the site's hierarchy.


How To Add Breadcrumbs Navigation in Blogger Blog?

  • Go to Blogger.com >> Template.
  • Backup the theme in case anything went wrong.
  • Now Select Edit HTML >> Proceed.
  • Tick the Expand the Widget Box.
Then Within the Template search for Skin and above it paste the Following CSS Coding. Remember: everyone has the authority to do any modification if is necessary otherwise this CSS is designed to take shape of any kind of blog or website.


#breadcrumbs-mbl {
  background: #eee;
  width:620px;
  margin-left:20px;
  border-width: 1px;
  font-family:'Oswald', Arial, Helvetica, sans-serif;
  margin-top:40px;
  text-transform: uppercase;
  border-style: solid;
  border-color: #f5f5f5 #e5e5e5 #ccc;
  border-radius: 5px;
  box-shadow: 0 0 2px rgba(0,0,0,.2);
  overflow: hidden;
}
#breadcrumbs-mbl  li{
  float: left;
}
#breadcrumbs-mbl  a{
  padding: .7em 1em .7em 2em;
  float: left;
  text-decoration: none;
  color: #444;
  position: relative;
  text-shadow: 0 1px 0 rgba(255,255,255,.5);
  background-color: #ddd;
  background-image: linear-gradient(to right, #f5f5f5, #ddd);
}
#breadcrumbs-mbl  li:first-child a{
  padding-left: 1em;
  border-radius: 5px 0 0 5px;
}
#breadcrumbs-mbl  a:hover{
  background: #fff;
}
#breadcrumbs-mbl  a::after,
#breadcrumbs-mbl  a::before{
  content: "";
  position: absolute;
  top: 50%;
  margin-top: -1.5em;
  border-top: 1.5em solid transparent;
  border-bottom: 1.5em solid transparent;
  border-left: 1em solid;
  right: -1em;
}
#breadcrumbs-mbl a::after{
  z-index: 2;
  border-left-color: #ddd;
}
#breadcrumbs-mbl  a::before{
  border-left-color: #ccc;
  right: -1.1em;
  z-index: 1;
}
#breadcrumbs-mbl  a:hover::after{
  border-left-color: #fff;
}
#breadcrumbs-mbl  .current,
#breadcrumbs-mbl  .current:hover{
  font-weight: bold;
  background: none;
}
#breadcrumbs-mbl  .current::after,
#breadcrumbs-mbl .current::before{
  content: normal;
}
ul{
  margin: 0;
  padding: 0;
  list-style: none;
}
#breadcrumbs-mbl .current,
#breadcrumbs-mbl .current:hover{
  font-weight: normal;
  background: none;
}
#breadcrumbs-mbl .current::after,
#breadcrumbs-mbl .current::before{
  content: normal;
}

Now once again, Search for <div class='blog-posts hfeed'> and just below it paste the Following XML Coding. Don’t do changes in the coding otherwise it would not work properly. Once done, Save the Template.


<b:if cond='data:blog.homepageUrl == data:blog.url'>
<!-- No breadcrumb on home page -->
<b:else/>
<b:if cond='data:blog.pageType == &quot;item&quot;'>
<!-- breadcrumb for the post page -->
<ul id='breadcrumbs-mbl'>
<li><a expr:href='data:blog.homepageUrl' rel='tag'>Home</a></li>
<b:loop values='data:posts' var='post'>
<b:if cond='data:post.labels'>
<b:loop values='data:post.labels' var='label'>
<b:if cond='data:label.isLast == &quot;true&quot;'>
<li><a expr:href='data:label.url' rel='tag'><data:label.name/></a></li>
</b:if>
</b:loop>
<b:else/>
</b:if><li><a class='current'><data:post.title/></a></li>
</b:loop>
</ul>
<b:else/>
</b:if></b:if>

All Done: Congratulations the breadcrumb Navigation is successfully integrated in your website. Since, Technique is modest. Therefore, it would not affect your SEO score. Feel Free to leave your comment below for further discussions. 


From The Editor's Desk:

We hope you guys have enjoyed today's tutorial. We will also implement Breadcrumb navigation on this site once we would find an appropriate position. What are your thoughts about it? take care of yourself till then, Peace, Blessings and Happy blogging.

How to Add All in One Social Subscribe Box Widget in Blogger

After the successful release of Fireworks Jquery Effect and Social Content Locker for Blogger Platform, we are thrilled to share yet another remarkable widget for Blogger Platform. About few months ago, one of our readers contacted us and requested to create a clean and elegant all in one Social Subscription widget. Unfortunately, that time we were unable to complete his request. Finally, we have designed a Clean and Classy Social Subscription widget that has significant Social Networking websites. We have not used any jQuery file. Therefore, it is extremely lightweight, and it would not affect your site speed. Today in this article, we will Add All in One Social Subscription Box in Blogger.

Features of All In One Social Subscription Box:

There is no doubt that this widget would add a new life to your website, and it would magnetize users to follow you on different social platforms. Though, it has awe-inspiring features, but we have listed the few key features below. 

  • It is extremely lightweight, and it would not affect your site speed.
  • Use compact (12K, 3.2M) or full (12.000, 3.200.000) numbers.
  • Reorder and incapacitate any of these networks which are suitable for your site.
  • Full support for all foremost browsers i.e. Firefox, Internet explorer, Chrome, and etc.

How To Install All in One Social Subscription Box in Blogger?

Steps mentioned below are extremely straightforward and would soak 5 minutes to complete the integration. Remember: This widget would work on any platform that supports HTML. Therefore, we can also use it on WordPress, Jhoomla and etc.

Go to Blogger.com >> Template >> Edit HTML >> Proceed.

In the template search for ]]></b:skin> and just above it Paste the Following CSS Coding. There is no need to do any modification in the coding because it is universal and would automatically fit your layout. After pasting the CSS coding, Save your template and proceed to the next step.


/*
 * MyBloggerLab.com All in one Social Subscription Box
 * --------------------------------------------------------*/
div.socialbox-mbl,
div.socialbox-mbl ul,
div.socialbox-mbl ul li,
div.socialbox-mbl ul li p,
div.socialbox-mbl ul li img,
div.socialbox-mbl ul li p span,
div.socialbox-mbl ul li a{
background: none;
border: none;
font-style: normal;
font-weight: normal;
margin: 0;
padding: 0;
}

div.socialbox-mbl ul,
div.socialbox-mbl ul li{
list-style: none;
}

div.socialbox-mbl ul li a,
div.socialbox-mbl ul li img{
display: inline;
width: auto;
}

div.socialbox-mbl ul li a.socialbox-button{
text-align: center;
}

div.socialbox-mbl.mbl-classic{
color: #768a96;
font-family: Arial, Helvetica, sans-serif;
font-size: 14px;
}

div.socialbox-mbl.mbl-classic ul{
background: url(https://blogger.googleusercontent.com/img/b/R29vZ2xl/AVvXsEjxw92nPpOl5eyKoVwOKDUUVRhEOUobSA6dlH6vnpbXDQiBt2DOT7CrQKEPDcNyaIlJA0xNrJOlznCrORYavAyRnoG4reaLc_SzO79_wrY7TtuavEP-dprpmaqCAeH2DODeGXvgHN1exgQ/s1600/classic-background.png) repeat;
border: 1px solid #d8dcdf !important;
-webkit-border-radius: 4px;
-moz-border-radius: 4px;
border-radius: 4px;
-webkit-box-shadow: 0px 2px 4px #dfe4e7;
-moz-box-shadow: 0px 2px 4px #dfe4e7;
box-shadow: 0px 2px 4px #dfe4e7;
margin: 0 !important;
padding: 0;
}

div.socialbox-mbl.mbl-classic ul li{
background-image: none;
border-bottom: 1px solid #d8dcdf;
height: 40px;
overflow: hidden;
padding: 19px 9px 0 9px;
}

div.socialbox-mbl.mbl-classic ul li:last-child{
border-bottom: none;
}

div.socialbox-mbl.mbl-classic ul li img{
border: none;
margin-right: 10px;
float: left;
}

div.socialbox-mbl.mbl-classic ul li p{
display: inline;
position: relative;
top : -3px;
}

div.socialbox-mbl.mbl-classic ul li p span{
color: #425763;
font-weight: bold;
}

div.socialbox-mbl.mbl-classic ul li a.socialbox-button{
background: url(https://blogger.googleusercontent.com/img/b/R29vZ2xl/AVvXsEgNU7ZoJr-Qloz3olhd23rBlvKlyIaYGVyADGMGOr_ACWrcrQT-XJuziR-7hNCizeOC_hbdLO8BMJXm7k_9ZlQQ4CVlwA_c7_mrJAAEc-ZLVyhOGiBhVlHEmvKevwqnA0dqi5HR4t_6m-M/s1600/classic-button.png) no-repeat;
border: 1px solid #d8dcdf;
-webkit-border-radius: 3px;
-moz-border-radius: 3px;
border-radius: 3px;
color: #425763;
float: right;
font-size: 11px;
font-weight: bold;
line-height: 11px;
padding: 6px 10px;
position: relative;
text-decoration: none;
text-transform: uppercase;
top: -4px;
}

div.socialbox-mbl.mbl-classic ul li a.socialbox-button:hover{
background: url(https://blogger.googleusercontent.com/img/b/R29vZ2xl/AVvXsEgNU7ZoJr-Qloz3olhd23rBlvKlyIaYGVyADGMGOr_ACWrcrQT-XJuziR-7hNCizeOC_hbdLO8BMJXm7k_9ZlQQ4CVlwA_c7_mrJAAEc-ZLVyhOGiBhVlHEmvKevwqnA0dqi5HR4t_6m-M/s1600/classic-button.png) 0 -27px no-repeat;
}

div.socialbox-mbl.mbl-classic ul li a.socialbox-button:active{
background: url(https://blogger.googleusercontent.com/img/b/R29vZ2xl/AVvXsEgNU7ZoJr-Qloz3olhd23rBlvKlyIaYGVyADGMGOr_ACWrcrQT-XJuziR-7hNCizeOC_hbdLO8BMJXm7k_9ZlQQ4CVlwA_c7_mrJAAEc-ZLVyhOGiBhVlHEmvKevwqnA0dqi5HR4t_6m-M/s1600/classic-button.png) 0 -54px no-repeat;
}


How To Add All in One Social Subscription Box in Blogger?

Go to Blogger >> Layout >> Add a Gadget.

From the List Select Add HTML/JavaScript and in the Text Box paste the following HTML Coding. To Reduce the widget of the Social Box Replace 300px according to your desire needs. 

<!-- MyBloggerLab.com All in one Social Subscription Box -->
<div class="socialbox-mbl mbl-classic" style="width: 300px !important">
<ul>
 <li>
<a href="http://www.facebook.com/mybloggerlab" title="Like on Facebook" rel="nofollow" target="_blank"><img src="https://blogger.googleusercontent.com/img/b/R29vZ2xl/AVvXsEhOD25v0_uzbl86isGqGaZQu2pEnuYkOfQGfDQVhqSy2vLdaYE9pAAMEzaTfsTxR__FrTL3J0393JnEpHNlGA7K43zkxXzt52rP9NzD8r1pxmTAaxR3pPSckvRrJlYZ33ovbXMWMkiQdrs/s1600/facebook_16.png" alt="Facebook" />
</a><p><span>3500</span> Fans</p><a href="http://www.facebook.com/mybloggerlab" class="socialbox-button" rel="nofollow"  title="Like on Facebook" target="_blank">Like</a>
</li>
<li>
<a href="http://twitter.com/mybloggerlab" title="Follow on Twitter" rel="nofollow"  target="_blank"><img src="https://blogger.googleusercontent.com/img/b/R29vZ2xl/AVvXsEjhZI0DzpzCVy5V9VWTtRf8ZiYs8UZ9Z5lA3PG9hgUXhkp9pwoIKM8W5q-gUZb67xZIoz8JU8rwb3uUMMnNsnO2R8aUxjVz-mZh_F6q_aqAaRDSccSSmVhOHpxrCiwtfMKC0yHf0YCC4uQ/s1600/twitter.png" alt="Twitter" /></a><p><span>3000</span> Followers</p><a href="http://twitter.com/mybloggerlab" class="socialbox-button" rel="nofollow"  title="Follow on Twitter" target="_blank" >Follow</a>
</li>
<li>
<a href="#" title="Subscribe to Youtube Channel" rel="nofollow" target="_blank"><img src="https://blogger.googleusercontent.com/img/b/R29vZ2xl/AVvXsEjuXUtJpBJt-eVVmP06VnHzNI5Fh0LHMm0LYJMqWo6nAupaO9nYi0DLI3TAn3MgLu3P8egVyEO2Xw_80zxyj222sayDeNq1PJEY5LI9B0RwM4Es4exthCx1QpNwjTLkjPk_Bee_GW6wwQc/s1600/youtube_16.png" alt="YouTube" /></a><p><span>400</span> Subscribers</p><a href="#" rel="nofollow" class="socialbox-button" title="Subscribe to Youtube Channel" target="_blank" >Subscribe</a>
</li>
<li>
<a href="http://pinterest.com/fosterzone" title="Follow on Pinterest" rel="nofollow"  target="_blank"><img src="https://blogger.googleusercontent.com/img/b/R29vZ2xl/AVvXsEjAqOLE41W2iI2MNOFJlWsd5a2YGpmTYUnjuLRl-uotQL_Jkbvd13lABC41uMYRKlNdWe0b178wVmYnJctp5bRB18crdKAGMYS4BdjJP93zyg1Er2RwFg9vMoLHzLJwtM0FP3QVfkRfD8A/s1600/Pinterestmbl.png" alt="Pinterest" /></a><p><span>200</span> Followers</p><a href="http://pinterest.com/fosterzone" rel="nofollow"  class="socialbox-button" title="Follow on Pinterest" target="_blank" >Follow</a>
</li>
<li>
<a href="https://plus.google.com/u/0/106374439082237286396" title="Follow on Google+" rel="nofollow" target="_blank"><img src="https://blogger.googleusercontent.com/img/b/R29vZ2xl/AVvXsEgrzKJt-zNQRYidVs6knOi_8b-IpmuA0JBZ0PLuyC2FBeCW87qoO6q8lmAIbitCIMshyUOconkHczYE-_cUbb85ggrh8NiN-1YgMvznmsihetNyo8XYkYM_rxJRkOgvzFmZ4eSREXn2fPs/s1600/Googleplusmbl.png" alt="Google+" /></a><p><span>1000</span> Followers</p><a href="https://plus.google.com/u/0/106374439082237286396" rel="nofollow"  class="socialbox-button" title="Follow on Google+" target="_blank" >Follow</a>
</li>
</ul>
</div>
<!-- End -->

All Done: After customizing the Gadget according to your desire needs, just Save the Gadget. Now go and check your site, we are sure it would not let you down. Feel free to leave your comments and suggestions would be more than welcomed. 

From The Editor's Desk:

We are two days away from the New Year's Eve, and we are quite pleased to announce that on New Year's Night Sharp at 12:00 o Clock we would reveal our newly born Website dedicated to Blogger Platform. Its a whole new venture and we are so excited about it.  Take a lot care till then, Peace, Blessings and Happy socializing. 

How To Create a Floating Social Media Bar in Blogger

There is no doubt that, from years Social Media has proven to be the most prominent source of Traffic for many websites. However, that does not mean each and every website has the charisma (Spark) to attain same traffic from it. The Ideal way of getting some social exposure is to convert your daily visitors into social Followers. Now the problem is that, how we should convert them into our Social Follower? The answer is pretty straightforward we can utilize some Social networking widgets that could guide visitors to the different Social platforms i.e. Facebook, Twitter, YouTube, Google+ and etc. For that reason, we have created yet another widget for Social Media Lovers. Today, in this article, we will be Learning How to Create a Social Media Bar in Blogger?


What is Social Media Bar?

It is a widget that has eight most popular Social Networking platforms which appears in a form of a Bar. It floats along your screen. Whenever, a visitor would scroll up or down a page it would float along him. There is no rocket science behind this widget because everything is done with the help of modest jQuery.  Consider the Following screenshot and enjoy the live action. 

Where Social Media Bar Would Appear?

It is extremely flexible, and we can place it either on the Left Side, Right Side, and Top or even down a page. Since, we have used a jQuery. Therefore, we have to use few commands like “bottom”, “top”, “left” and “right” to display it on different parts of our website. To clear your misconception considers the following screen.

How To Add Social Media Bar Widget in Blogger?

Many of our readers were complaining that we always share long tail tutorials. Therefore, from now one we would try our finest to complete the Widget Installation in just one step. Consider the following instructions. 

Go To Blogger.com >> Template >> Edit HTML >> Proceed.

In the template search for </body> and just above it paste the following Coding. Don’t change the coding otherwise it would stop working. If anyone is unable to find the </body> tag, then he can paste the coding just below <body> tag. 


<!-- import Scripts -->
<script type="text/javascript" src="https://mybloggerlab.googlecode.com/files/jquery-1.7.1.min.js"></script>
<script type="text/javascript" src="https://mybloggerlab.googlecode.com/files/mblsocialbar.js"></script>
<div id="scolder">
<script type="text/javascript" src=" http://mbl-flipper-google-blogger.googlecode.com/files/socialflipmin.js"></script></div>
<link href='http://mybloggerlab.com/StyleSheet/mblsocialbar.css' rel='stylesheet' type='text/css'/>

<!-- MBL Social Media Bar For Blogger -->
<script type="text/javascript">
$(document).ready(function(){
$.mblSocialBar({
items: {
twitter: { url: '#', text: 'Follow me on twitter' },
facebook: { url: '#', text: 'Profile on facebook' },
rss: { url: '#', text: 'RSS Feed' },
google: { url: '#', text: 'Profile on google+' },
youtube: { url: '#', text: 'Profile on youtube' },
orkut: { url: '#', text: 'Profile on orkut' },
myspace: { url: '#', text: 'Profile on myspace' },
digg: { url: '#', text: 'Profile on digg' },

},
show: 8,
position: "left",
skin: "clear"
});

});
</script>


  • Adding URL: Replace All # with your URLs According to the desire needs.
  • Change Positions: In order to change the position of the widget Replace “Left” to Either “right”, “top” or “bottom” from the coding according to your desire needs. Remember: Don't use Capital Letters otherwise it would stop working.
  • Display Less Social Site: In order to Display Less Social Sites just Replace “8” with less numbers i.e. 7, 6, 5 and it would show less buttons. However, it would start displaying an Arrow that would allow visitors to get access to the Hidden sites.  
  • Change Skins: We have added two Themes to this Social Media Bar i.e. “clear” and “dark”. To Change the current “clear” theme to dark just replace clear to Dark from the JavaScript coding. 
All Done: After customizing everything according to the desire needs, then save the template by pressing “Save Template” button. Go visit your site and we are sure it would not let your site’s look down. Don’t forget to leave your suggestions. 


From The Editor’s Desk:

Hope this Social Bar would help everyone in building their social audience. This bar might not work on such sites which are already using other Floating widgets i.e. Floating Older/Newer Posts and etc. What are your thoughts about the marvel widget? Take a lot care till then, Peace, blessings and happy floating.

Credits: This Widget is solely created by MBL Developers. Therefore, While Sharing this tutorial/widget with your followers do not forget to give a Credit back link to MyBloggerLab. It’s our humble request!

How To Customize Label Cloud in Blogger With CSS3 Effects

Are you fed-up because of the yucky Label Clouds that appears at the sidebar of your Blogger Blog? Sometimes, a dirty looking Label cloud could horribly dent the complete outlook of a website. Consider a website that has a neat and stylish look but if the Label Clouds is unclean then, it could literally kill the complete viewpoint of a reader. Since, the default Labels Widget of Blogger Platform does not have a clean and elegant look. Therefore, we have to customize it with the help of CSS. As the whole blogger community is busy in upgrading their site with CSS3, it is essential that we also make use of this tremendous Language. For that reason, today in this article, we will learn How to Customize Labels Cloud in Blogger with CSS3.
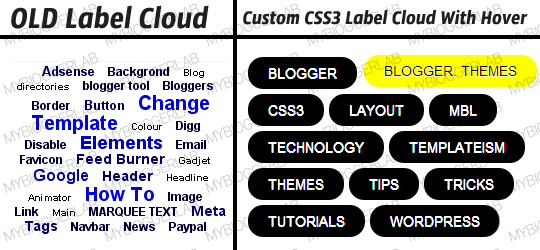
The Default Label Cloud Widget for Blogger Platform has a quite old look. Since, we are in the days of CSS3. Therefore, we have to apply latest techniques. Consider the Following screenshot to see the Label Clouds i.e. the Default one and the Customized one. 
Older/Newer Label Cloud
Each Label Cloud Link is well kept under <a class/> that allows us to customize each and every Label link cleanly. We have also assigned a font size, so it does not overlap the pre-existing Default StyleSheet. Our custom design would override the CSS. Thus, it would give an entire new look.

How To Customize Label Cloud with CSS3?

The steps mentioned below are fairly straightforward and would hardly take few minutes to complete. Consider the following instructions as mentioned below. 
  • Go To Blogger.com >> Your Site >> Add a Gadget >> Label.
  • Now match the settings which are shown in the screenshot below.
Custom Label Cloud Setting For Blogger
  • Select the Cloud from the Display settings.
  • Uncheck the Show number of post per label.
Now go ahead and Save the widget and that’s it we have successfully integrated a Label Cloud widget.

Customizing and Stylizing Blogger Label Cloud Widget:

  • Once again go to Blogger >> Template >> (Create a backup in case anything went wrong).
  • Select Edit HTML >> Proceed.
  • Now with in the Template Search for ]]></b:skin> (CTRL+F Shortcut to quick search) and just above it paste the following CSS Coding.
/*--- MBL Custom Label Cloud With CSS3 --- */
.Label a{
padding-left:20px;
background:#000;
padding:0 20px;
color:#fff!important;
border-radius:100px;
-moz-border-radius:100px;
height:32px;
line-height:32px;
text-transform:uppercase;
text-decoration:none;
border:none !important;
-webkit-transition:all .3s ease-in-out !important;t: 30pxt: 30px;
float:left;
margin-left:5px;
margin-top:5px;
font-size:14px; }

.Label a:hover{
color:#000 !important;
background:#ff0; }

To Change the Hover Color Replace #ff0; with any color according to the desire needs.
To increase/decrease the font size replace 14px according to your needs.

All Done: After customizing save the template. Go a head and check out your website and we are sure that you would love the modification that we have made in the Label Cloud. Feel free to leave your comments and suggestions.

From The Editor's Desk:

Hope everyone has enjoyed this small modification. Now everyone can sense that a Small Chunk of CSS3 has the charm to spice up a website. Its just a starting to this week because we have some awe-inspiring widgets coming up. What are your thoughts about it. Suggestions would be more then welcome. Take a lot care till then, Peace, blessings and happy stylizing.

How to Add jQuery Social Followers Count Plugin in Blogger

Are you bored of updating your Social Follower’s count manually in your Widgets? Every now and then lots of visitors arrive on your website. Thus, few of them become your social followers by either liking your Facebook fan page or following your site on twitter. This is the reason, why your Social Followers count almost changes on a daily basis. Therefore, it gets too annoying to update your social Followers count manually in your social subscription widgets. In the past, we have shared a lot of Social Subscriptions gadgets, but they never update the subscribers count on automation. However, finally MBL developers are able to develop a widget that updates the followers count on automation. Today in this article, we will learn How to add automatic jQuery Social Follower Count Plugin for Blogger.

Few months ago a user left a comment on MBL suggesting us to create a widget that automatically updates the followers count.  
Wali Khan Commented:

Faizan, actually this widget and similar you already published on your blog would be better if they would have an auto increment function.. but without that it is just headache to update them when followers are increased.. 

Let me know if I'm wrong!
That’s what our Founder Syed Faizan Ali Replied to the above comment.
Syed Faizan Ali Replied:
Well, you are quite right that we have widget similar to the one which we have shared today. However, it has more elegant look.

Coming back to point, Well to make it auto update we have to use API of Different Social Websites. Which is indeed a difficult TASK. Nonetheless, we would try to create a auto Updating Social Networking widget.

Since, Blogger is not flexible enough. That why we always prefer custom. Self updating widgets.

After viewing this gadget, everyone would think that what is uniqueness in this thing? There are tons of same gadgets available on different nooks and corners of the web. However, this gadget has the functionality which other does not have. It updates the followers count on automation plus an elegant design. What else you want? 

How to Install  jQuery Social Count Plugin in Blogger?

The instructions mentioned below are extremely straightforward, and would take less than 2 minutes to complete the integration. Remember: This widget has the flexibility to work on any kind of platform that supports HTML. Therefore, we can also use it on WordPress, Jhoomla and etc. 
Go to Blogger.com >> Template >> Edit HTML >> Proceed.
In the Template coding search for]]></b:skin> and just above it paste the following CSS coding. There is no need to do any customization in the CSS coding. Therefore, keep it as it is.

/*--- MBL jQuery Social Follower Count Plugin --- */
.mblsocial-container{
font-size: 13px;
color: #666;
font-family: arial,sans-serif;
line-height: 25px;}
.mblsocial-container a,.mblsocial-container a:visited
{color:#45BAF5;
text-decoration: none;}
.count
{font-weight:bold;}
.row{
    position: relative;
    width: 320px;
    margin: 20px 0px;
    height: 100px;
}
.col_4{
    width: 155px;
    float: left;
    margin: auto;
    text-align: center;
}
.box{
    width: 130px;
    height: 100px;
    margin: auto;
    border: 1px solid #E5E7EB;
    background: #F1F3F8;
    -webkit-border-radius: 3px;
    -moz-border-radius: 3px;
    border-radius:3px;
}
.cell_1{
    width: 30px;
    height: 80px;
    position: relative;
    float: left;
    margin: auto;
}
.cell_2{
    font-size: 30px;
    height: 80px;
    width: 80px;
    text-align: center;
    line-height: 80px;
    font-family: arial, sans-serif;
    font-smooth: always;
    position: relative;
    margin: auto;
    color: #333;
}
.cell_3{
    height: 20px;
    width: 132px;
    float: left;
    margin: auto;
    line-height: 20px;
    font-size: 12px;
    color: #999;
    background: #ccc;
    margin-left: -1px;
    -webkit-border-bottom-right-radius: 3px;
    -webkit-border-bottom-left-radius: 3px;
    -moz-border-radius-bottomright: 3px;
    -moz-border-radius-bottomleft: 3px;
    border-bottom-right-radius: 3px;
    border-bottom-left-radius: 3px;
}
.icon{
    width: 40px;
    height: 40px;
    margin-top: 17px;
    border: none;
}
.facebook-blue{
background-color: #5074BF;
background-image: -moz-linear-gradient(top, #88AEFC, #3B5998);
background-image: -ms-linear-gradient(top, #88AEFC, #3B5998);
background-image: -webkit-gradient(linear, 0 0, 0 100%, from(#88AEFC), to(#3B5998));
background-image: -webkit-linear-gradient(top, #88AEFC, #3B5998);
background-image: -o-linear-gradient(top, #88AEFC, #3B5998);
background-image: linear-gradient(top, #88AEFC, #3B5998);
background-repeat: repeat-x;
filter: progid:DXImageTransform.Microsoft.gradient(startColorstr='#88AEFC', endColorstr='#3B5998');
border-color: #23487E;
color: #fff;
text-shadow: 0 1px 1px rgba(60, 60, 60, 0.75);
}
.twitter-blue{
background-color: #44B8F2;
background-image: -moz-linear-gradient(top, #96DCFF, #2BA6E3);
background-image: -ms-linear-gradient(top, #96DCFF, #2BA6E3);
background-image: -webkit-gradient(linear, 0 0, 0 100%, from(#96DCFF), to(#2BA6E3));
background-image: -webkit-linear-gradient(top, #96DCFF, #2BA6E3);
background-image: -o-linear-gradient(top, #96DCFF, #2BA6E3);
background-image: linear-gradient(top, #96DCFF, #2BA6E3);
background-repeat: repeat-x;
filter: progid:DXImageTransform.Microsoft.gradient(startColorstr='#96DCFF', endColorstr='#2BA6E3');
border-color: #149BDE;
color: #fff;
text-shadow: 0 1px 1px rgba(60, 60, 60, 0.75);
}
.green {
background-color: #41AD2B;
background-image: -moz-linear-gradient(top, #4FDE33, #368F24);
background-image: -ms-linear-gradient(top, #4FDE33, #368F24);
background-image: -webkit-gradient(linear, 0 0, 0 100%, from(#4FDE33), to(#368F24));
background-image: -webkit-linear-gradient(top, #4FDE33, #368F24);
background-image: -o-linear-gradient(top, #4FDE33, #368F24);
background-image: linear-gradient(top, #4FDE33, #368F24);
background-repeat: repeat-x;
filter: progid:DXImageTransform.Microsoft.gradient(startColorstr='#4FDE33', endColorstr='#368F24');
border-color: #1B7808;
color: #fff;
text-shadow: 0 1px 1px rgba(60, 60, 60, 0.75);
}
.black {
background-color: #333;
background-image: -moz-linear-gradient(top, #666, #000);
background-image: -ms-linear-gradient(top, #666, #000);
background-image: -webkit-gradient(linear, 0 0, 0 100%, from(#666), to(#000));
background-image: -webkit-linear-gradient(top, #666, #000);
background-image: -o-linear-gradient(top, #666, #000);
background-image: linear-gradient(top, #666, #000);
background-repeat: repeat-x;
filter: progid:DXImageTransform.Microsoft.gradient(startColorstr='#666666', endColorstr='#000000');
border-color: #000;
color: #fff;
text-shadow: 0 1px 1px rgba(60, 60, 60, 0.75);
}
#mycontent{
color:#a1a1a1; 
text-align:center; 
line-height: 1.9; 
width:310px; 
border: 1px solid #E5E7EB;
background: #F1F3F8;
-webkit-border-radius: 3px;
-moz-border-radius: 3px;
border-radius:3px;
}
That's All Save the Template by Pressing "Save Template" Button and proceed to the next step.

How to add Automatic jQuery Social Follower Count Plugin for Blogger?

  • Go to Blogger.com >> Layout >> Add a Gadget.
  • From the list select Add HTML/JavaScript.
  • Now in the HTML Box paste the following coding. 
<script type="text/javascript" src="https://facebookchatfun.googlecode.com/files/jquery-1.7.1.min.js"></script>
<script>
$(document).ready(function(){
$('#shared').mblsocialcount({
'service':'facebook',
'countof':'shares',
'query':'http://www.facebookchatfun.blogspot.com',
'callback':'formatCount'
});
$('#tweets').mblsocialcount({
'service':'twitter',
'countof':'tweets',
'query':'facebookchatfun',
'callback':'formatCount'
                }); 
$('#fblikes').mblsocialcount({
'service':'facebook',
'countof':'likes',
'query':'facebookchatfun',
'callback':'formatCount'
                });   
$('#followers').mblsocialcount({
'service':'twitter',
'countof':'followers',
'query':'facebookchatfun',
'callback':'formatCount'
                });               
            });
function formatCount(element,count)
{var display_count='';
count=parseInt(count,10);
if(count>1000000)
{count=count/1000000;
count=count.toFixed(1);
display_count=count+'m';}
else if(count>1000)
{count=count/1000;
count=count.toFixed(1);
display_count=count+'k';}
else{display_count=count;}
element.html(display_count);}
        </script>
<div class="mblsocial-container">
    <div class="row">
         <div class="col_4">
            <a href="http://www.facebook.com/usamaniazi786" target="_blank" rel="nofollow">
<div class="box">
    <div class="cell_1"><img src="https://blogger.googleusercontent.com/img/b/R29vZ2xl/AVvXsEiS5X6NyA7TsR2eKUQuS_zsrMGUPudIR9d32BVxx0hXpkHkZXszr4nPkjUz86IHBGNoRwPX7Kc8dwYfOuM_17E4NckhHH7tMQeNePHFPEdTfAB94AeC_ZiRzPtP7LHzetUBxsQpxJxORoE/s100/facebook.png" class="icon"/></div>
        <div class="cell_2"><span id="fblikes" class="count"></span></div>
            <div class="cell_3 facebook-blue">Likes</div>
              </div>
                 </a>
                   </div>      
<div class="col_4">
    <a href="http://www.mybloggerlab.com" target="_blank" rel="nofollow">
<div class="box">
        <div class="cell_1"><img src="https://blogger.googleusercontent.com/img/b/R29vZ2xl/AVvXsEiS5X6NyA7TsR2eKUQuS_zsrMGUPudIR9d32BVxx0hXpkHkZXszr4nPkjUz86IHBGNoRwPX7Kc8dwYfOuM_17E4NckhHH7tMQeNePHFPEdTfAB94AeC_ZiRzPtP7LHzetUBxsQpxJxORoE/s100/facebook.png" class="icon"/></div>
            <div class="cell_2"><span id="shared" class="count"></span></div>
                <div class="cell_3 green">Shares</div>
                </div>
                     </a>
                         </div>
                   </div>
<div class="row">
     <div class="col_4">
         <a href="http://www.twitter.com/care4utricks" target="_blank" rel="nofollow">
<div class="box">
     <div class="cell_1"><img src="https://blogger.googleusercontent.com/img/b/R29vZ2xl/AVvXsEhc7m572qHPDCfcY2UatgnrEEV9fVRXvDY0ow6hyphenhyphenfHYoqp4Y-kDAyq-Q8T5oX2NxHGiVRf1_aAV0xDuGezWSQMSlCLth2fBO7LQ8qG1l6SwXu9U-fivKMsRKUmWnUcrqOkRCjcI1YV2x0U/s100/twitter.png" class="icon"/></div>
        <div class="cell_2"><span id="followers" class="count"></span></div>
            <div class="cell_3 twitter-blue">Followers</div>
              </div>
                 </a>
                   </div>
  
  
<div class="col_4">
    <a href="http://facebookchatfun.blogspot.com" target="_blank" rel="nofollow">
<div class="box">
     <div class="cell_1"><img src="https://blogger.googleusercontent.com/img/b/R29vZ2xl/AVvXsEhc7m572qHPDCfcY2UatgnrEEV9fVRXvDY0ow6hyphenhyphenfHYoqp4Y-kDAyq-Q8T5oX2NxHGiVRf1_aAV0xDuGezWSQMSlCLth2fBO7LQ8qG1l6SwXu9U-fivKMsRKUmWnUcrqOkRCjcI1YV2x0U/s100/twitter.png" class="icon"/></div>
         <div class="cell_2"><span id="tweets" class="count"></span></div>
             <div class="cell_3 black">Tweets</div>
                </div>
                    </a>
                       </div>
      </div>
<div id="mycontent">Created By <a href="http://www.mybloggerlab.com">MyBloggerLab.com</a>
</div>
   </div>
   
<script type="text/javascript" src="https://mybloggerlab.googlecode.com/files/mblsocialcount.js"></script>

Customization:

For Twitter Share/Follow:
  • Replace http://twitter.com/care4utricks with your Twitter username.
  • Replace http://twitter.com/care4utricks with your Twitter fan page URL.
For Facebook Share/Likes:
  • Replace http://facebook.com/usamaniazi786 with your Facebook Fan username.
  • Replace http://facebook.com/usamaniazi786 with your Facebook fan fage URL
ATTENTION: Don't remove the credit link. Anyone who remove the link, then it could destroy his Blog maliciously. Therefore, keep the credit links intact. If you failed to do so, then we would not hold any responsibility because legal action would be taken against him. However, if anyone want to purchase a Legal licence then he can contact us. 

From the Editor's Desk:

Combining the API with the Gadget was an uphill task. Our team did a lot of hard work altogether and the outcome was simply outstanding. We would surely thank our Reader who suggested us to work over such a significant gadget. What are your thoughts about the innovation? Yeah, we know WordPress already has it but what about Blogger huh?. Take a lot care till then, Peace, Blessings and Happy Socializing.